¶ Welcome
Thank you for purchasing the TFDi Design 717! In this document, various features of the aircraft, addon manager, and anything not covered in the in-depth guides will be covered. For information on the TFDi Design 717’s FMS, Systems, or flows, see the other guides located in the documentation folder.
¶ History
Before getting started, it is essential to learn about the history of the 717 to fully understand why this is not a typical Boeing aircraft.
The 717 did not start out as a Boeing product; instead, it was a project led by the McDonnell-Douglas Corporation to fill the 100-passenger regional jet market as a replacement to old DC-9s. It began life in 1983 as a potential replacement for the DC-9-30. The newer DC-9-80s (Super 80s) were larger and did not always suit the job, and the DC-9-30 was beginning to show its age.
Douglas started to research the replacement to the 30s with a newer model that had more fuel-efficient engines and new functions to help serve the newly deregulated American airline industry. It was given the designation of DC-9-90; however, this project was delayed due to the recession of the 1980s.
Once Douglas merged with McDonnell, the project was not immediately picked up again, and the MD-87 was produced to fulfill the role that was intended to be taken on by the DC-9-90s. Sales did not excel for the MD-87, and the project was eventually looked at once more. At the 1991 Paris Airshow, McDonnell-Douglas announced the development of the MD-95, a 105 seat, twin-turbofan jet with a range just short of 1500nm.
Sales began to build up in 1994, and the jet was being prepared to enter into service soon when it was announced McDonnell-Douglas would merge with Boeing in 1997. At this time, the project was in limbo as Boeing was expected to cancel the project and opt to focus on its new 737-600 model, which served a similar purpose. However, to many in the industry’s surprise, Boeing announced it would rebrand the MD-95 as the Boeing 717 instead. The aircraft saw minuscule changes to it during the transition and lead to a flight deck that carries much of McDonnell-Douglas' original design philosophy.
¶ Installation
To install the TFDi Design 717, one of the supported simulators must be installed first. This includes:
- Microsoft Flight Simulator X
- Microsoft Flight Simulator X: Steam Edition
- Prepar3D V2.X
- Prepar3D V3.X
- Prepar3D V4.X
- Prepar3D V5.X
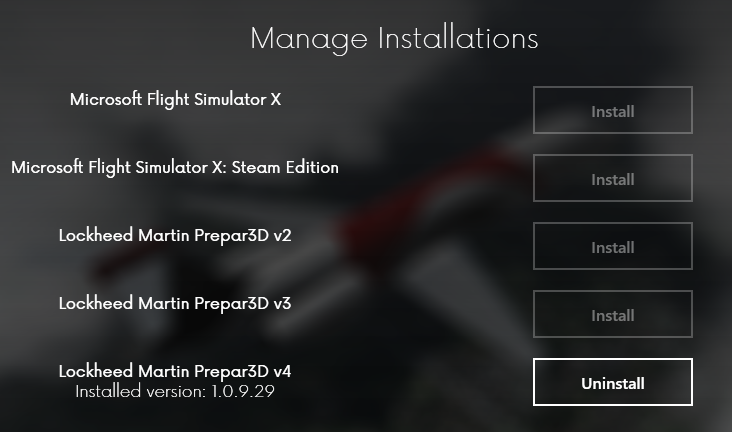
After installation, the currently installed version will be displayed under the simulator title. After clicking Install, a prompt will appear after a short while outlining that a few prerequisites need to be installed alongside the TFDi Design 717. These allow for the aircraft to properly run within the simulator. A list of what is installed is available below.
Once the TFDi Design 717 has been installed to the selected simulator, the Addon Manager will return to the Installation page and will now display an Uninstall button and the currently installed version beneath the installed sim.
¶ Installation Breakdown
At TFDi Design, it is important for users to know what is happening during the installation process of the software. In this section, a breakdown of what gets installed, and what it is used for is found. If you have any questions about the installation process, please open a ticket with us.
¶ Addon Manager
- Application Folder:
- Addon Manager Update Tool.exe – Used to update the Addon Manager
- Addon Manager Update Tool.ini – Used to help notify when an update is available
- AddonManager.exe – Main Addon Manager Executable
- AircraftSharingServer.dll – Aircraft Sharing Server
- Udt.dll – Aircraft Sharing Server Protocol
- UnmanagedFunctions.dll – Provides SimConnect Interface for Addon Manager
¶ Start Menu\Programs:
- TFDi Design Addon Manager Shortcut – Shortcut for AddonManager.exe
- TFDi Design Addon Manager Update Tool Shortcut – Shortcut for Addon Manager Update Tool.exe
Desktop:
- TFDi Design Addon Manager Shortcut – Shortcut for AddonManager.exe
¶ TFDi Design 717 Installation
Sim Folder:
- Udt.dll – Aircraft sharing server protocol
Effects Folder:
- TFDi_Design_717_*.fx – Effects used For TFDi Design 717
Texture Folder:
- TFDi_Design_717_EffectsAtlas.dds – Texture used for effects mapping
¶ SimObjects\Airplanes\TFDi_Design_717 Folder
- Aerodynamics.air – Configuration file for flight dynamics
- Aircraft.cfg – Configuration file for the TFDi Design 717
- Gsx.cfg – Configuration file used by GSX (FSDreamTeam)
- Data: Location of navigation database
- Panel: Location of textures, shaders, functions, and aircraft states
- 717.dll – Main systems and functions
- MV_EGPWS.dll – Ground proximity systems and functions
- Panel.cfg – Configuration for panels
- PDK2D2D.dll – Framework for gauge rendering service
- Texture.TFDiDesign Folder: Holds textures and configuration files for TFDi Design paint
- Texture Folder: Contains standard textures used by all repaints
- Sound Folder: Location of all TFDi Design 717 sounds
- Nightlighting (FSX/SE/V2/V3 Only): Contains textures and configuration for night lighting
- Milviz_Lighting_Service.exe - Night lighting rendering tool
- RealLight (V4 Only): Contains textures and XML configuration for RealLight night lighting
- Model: Contains 3D models for interior and exterior and model configuration file
- TrueGlass (V4 Only): Contains textures and XML configuration for TrueGlass utility
- Fonts Folder:
TFDi717*.ttf – Fonts used by TFDi Design 717
¶ User Documents\TFDi Design\717 Folder
- Tablet Folder:
- Documents Folder: Folder structure tablet reads Images from in simulator
- CaptureTool.exe – Executable for screen capturing
- CaptureTool.dll – Provides native functions to Capture Tool utility
- Background.png – Background for Tablet (Can be changed)
- Persistence Folder: Folder Where persistence files are located
- Logs Folder: Debug log output
- Documentation Folder: Location of documentation and licenses
- Company Routes Folder: Folder the TFDi Design 717 FMS finds company routes
¶ Redistributables
- Vcredist_*.exe – Microsoft Visual C++ Redistributables (Used for functions and .dll files)
- AccessDatabaseEngine_X64.exe – Used for navigation database interaction
- Dxwebsetup.exe – DirectX runtimes (rendering engine)
- SimConnect.msi – SimConnect utility (provides interaction between the aircraft and the sim)
- TrueGlassInstaller.exe – Installs TrueGlass utilities
- RealLightInstaller.exe – Installs RealLight utilities
¶ Activation Issues
The most common type of activation issue results from having hit the activation limit. You can reset your own activations via the client area. For more information, view the solutions article here.
If there are issues activating the TFDi Design 717, it can take place most of the time in two different parts during installation. The first and most common issue is during the initial installation through the addon manager.
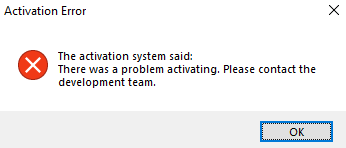
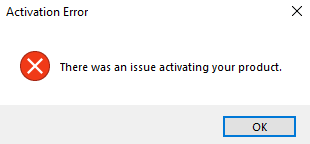
If an error is received during the installation process in the addon manager, run the Addon Manager as an administrator. If there is still an issue, verify https://blog.tfdidesign.com is accessible. If those two have failed, try attempting to install with any firewall and anti-virus temporarily disabled. If neither of those work, it is likely an issue with the communication between the computer and the activation server or the activation server has flagged the request. If this is the case, please open a ticket with us.
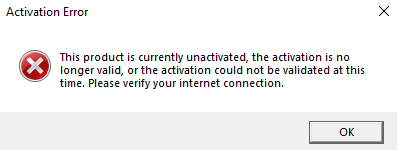
If an error is received during the loading of the aircraft in the simulator, this is most likely an issue with the communication between the activation server and the simulator. Verify an active internet connection is established and the simulator is running as admin. If the issue persists, please open a ticket with us.
¶ To Select The Aircraft
¶ Flight Simulator X
Begin by launching FSX, then go to the Free Flight tab. Scroll to find the TFDi Design 717 and select it.
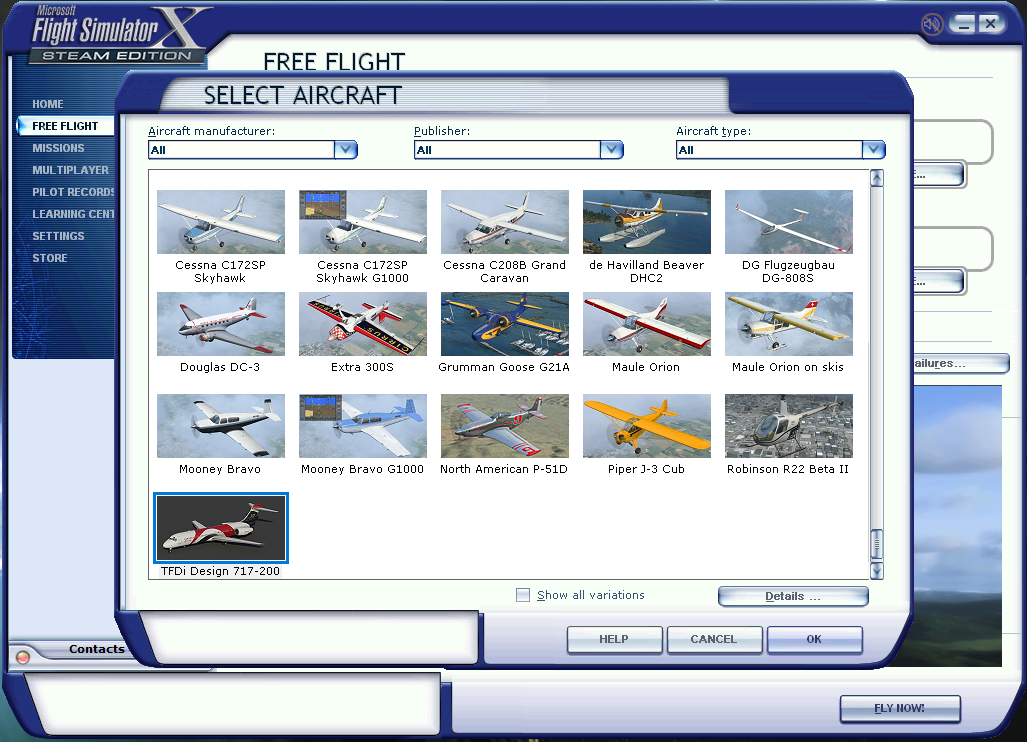
Filters can also be used to select it from the dropdown menus at the top. The aircraft can be found by using any of the following:
Aircraft Manufacturer: TFDi Design
Publisher: TFDi Design
Aircraft Type: 717-200
If multiple liveries are installed, make sure that the “Show All Variations” box check marked. This button can be found towards the button of aircraft selection screen above the help button.
¶ Prepar3d
Begin by launching Prepar3D, then go to the Select Vehicle screen. Scroll to find the TFDi Design 717 and select it.
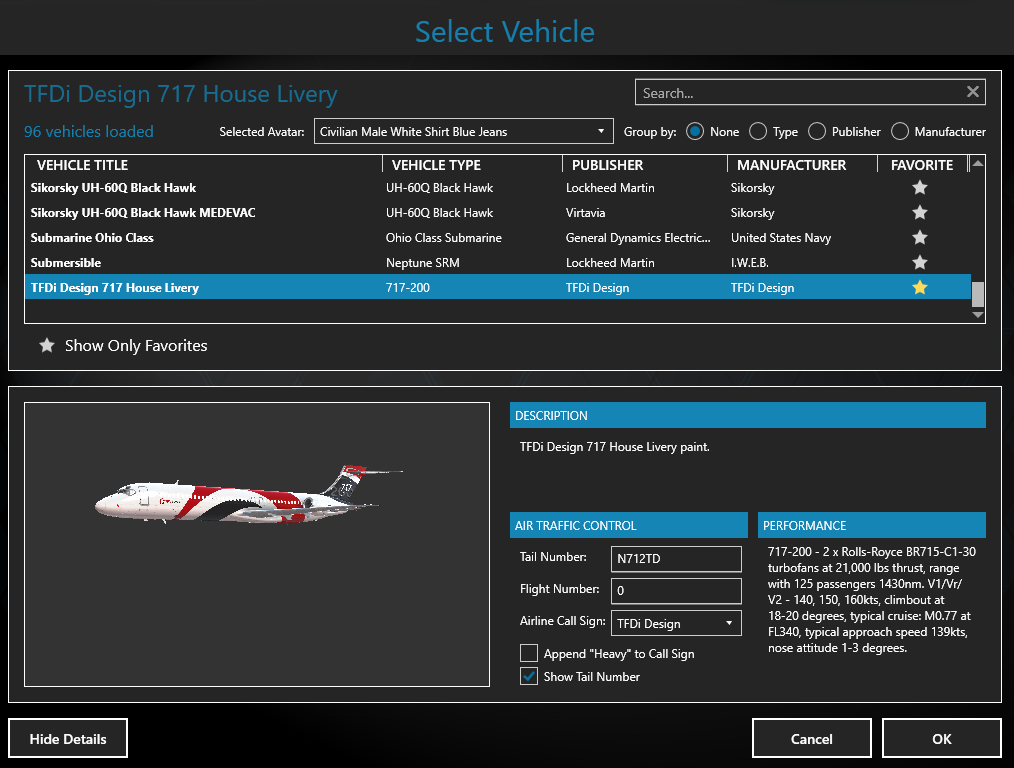
The search bar can be also used to find the aircraft. The aircraft can be found by using any of the following:
Manufacturer: TFDi Design
Publisher: TFDi Design
Aircraft Type: 717-200
Be sure to take advantage of the favorites system by clicking the star next to aircraft entry. From there, click the Show Only Favorites options above the aircraft preview window.
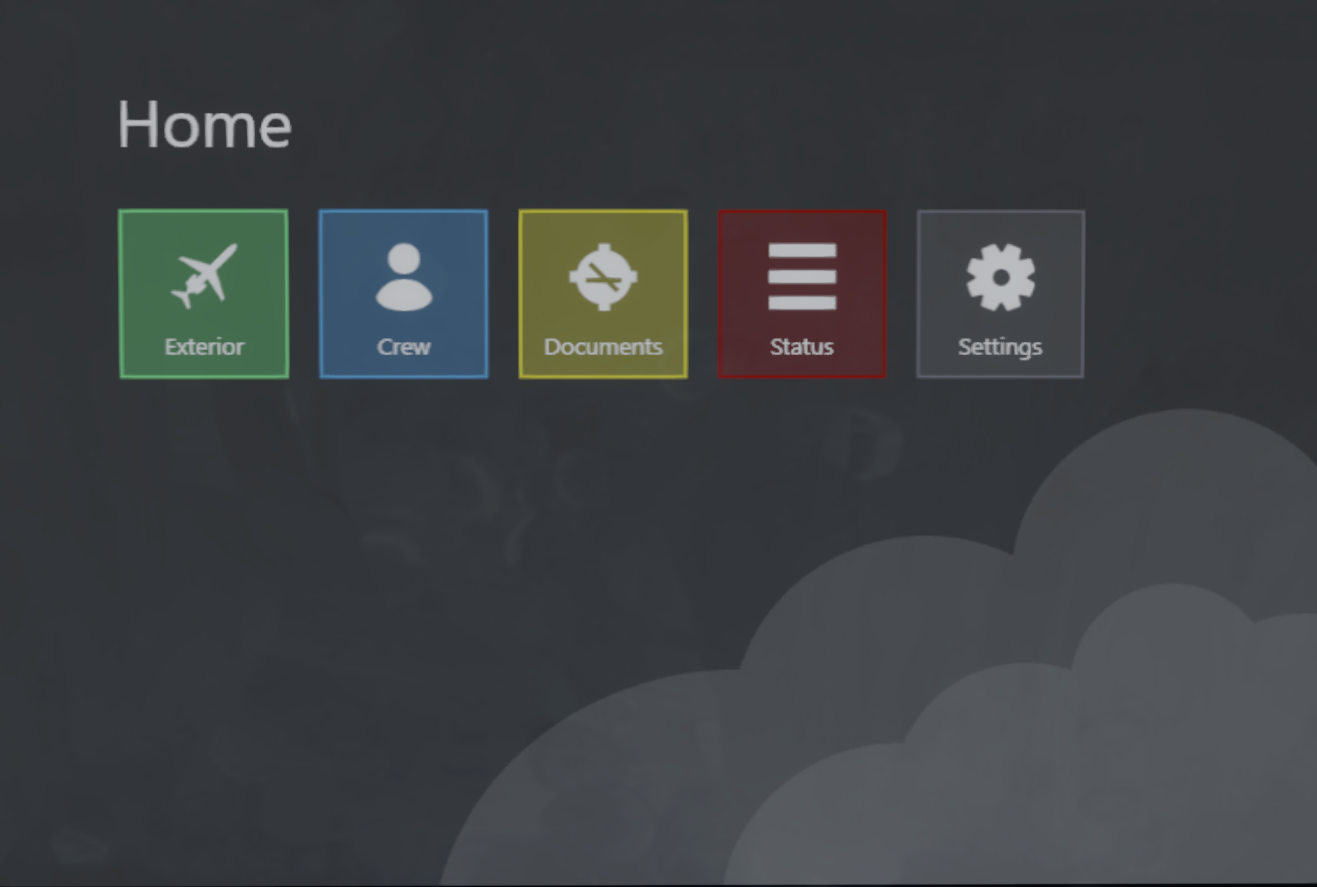
¶ Learning The Tablet
The TFDi Design tablet is a robust tool for managing the aircraft during the in-sim experience. There are several applets that let control or display various items during flight. This section will go over how to use the tablet and its applets, change the background, and how to hide and unhide it.
¶ Changing The Background
To change the background of the tablet, create a PNG image with the dimensions of 1019 x 680. Once the image has been created, place it in User Documents\TFDi Design\717\Tablet. It must be named Background.png.
If desired, a different background can be created for each livery or variation of the aircraft. To do this, simply create an image name with the tail number first, a decimal, then Background.png. Example: “N712TD.Background.png”
¶ Waking, Sleeping, Hiding, And Unhiding
To put the tablet to sleep, click anywhere on the bezel.

To hide the tablet, click anywhere on the bezel once the tablet has been put to sleep. To unhide the tablet, click on the sleeve beneath the parking brake for the captain’s tablet, or the sleeve beneath ACP for the first officer’s tablet.
¶ Applets
To open any of the applets, just click on the applet icon. If an applet is open, click the X in the top right corner of the applet. This will close the applet and it will return to the home screen.
¶ Exterior
The exterior applet is used to do various functions to the aircraft that are usually managed by the ground or flight crew.
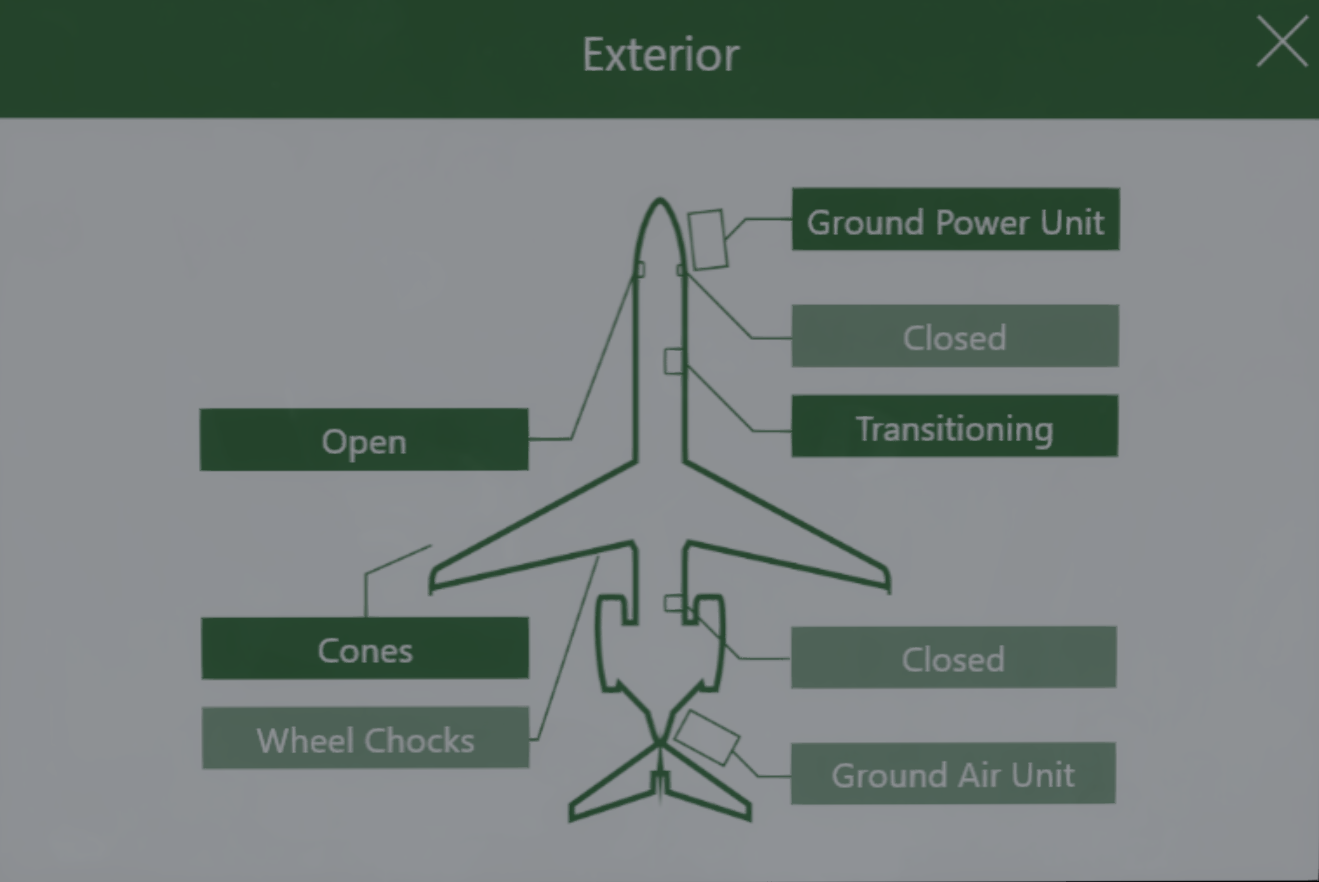
Inactive items will be in whitewashed green color, while active items will be in a solid green color.
Click on any of the “Closed” buttons to open the respective doors. These will open the doors and change the button to be a dark green and display “Transitioning”. Once the door is open, it will display “Open”.
If it is not a door, it can be connected or placed by clicking the respective button, which will turn dark green when it is connected or placed.
¶ Crew
The crew page applet can be used to see the status of the aircraft sharing session.
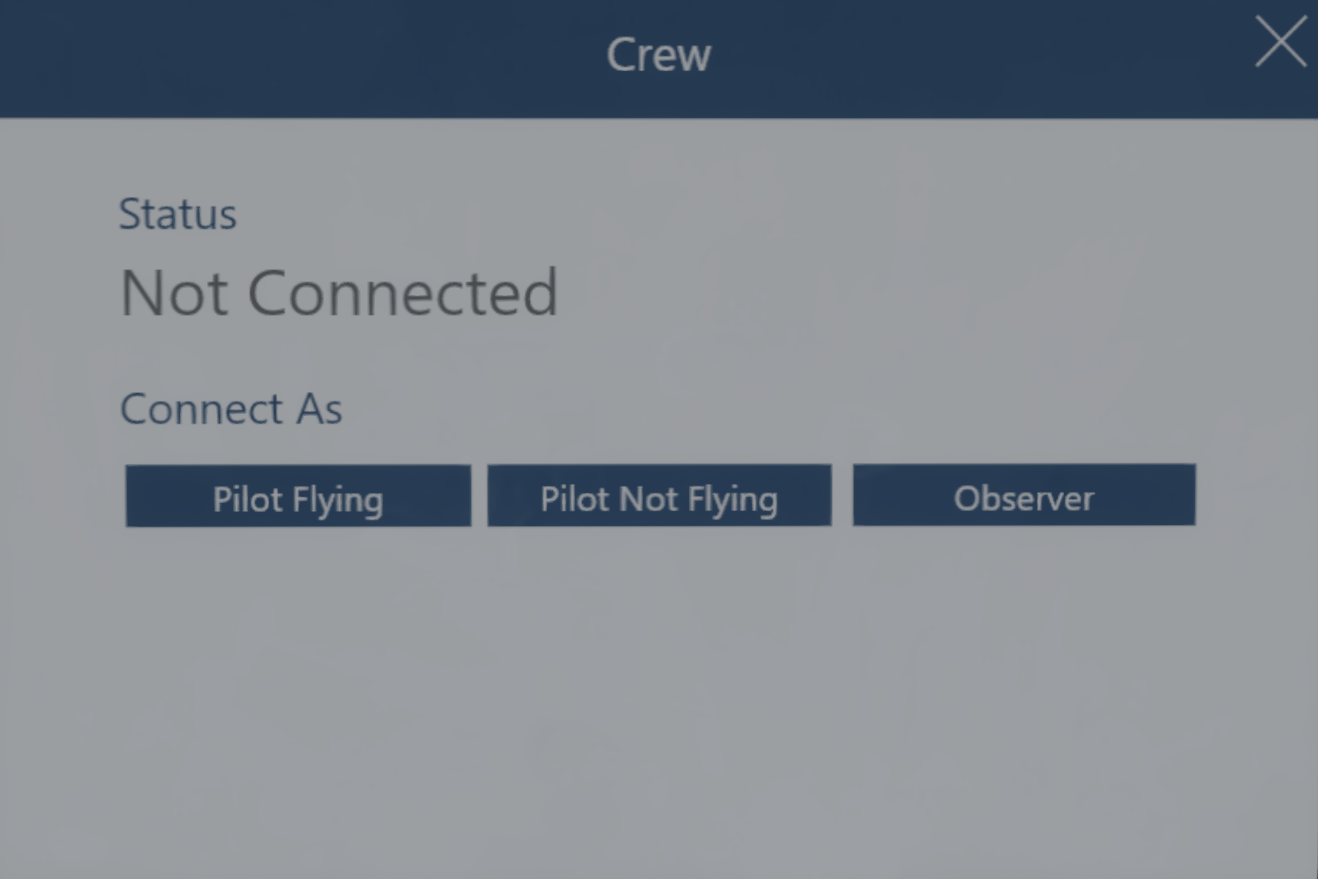
Click any of the buttons on the bottom page to connect to the configured settings in the addon manager (please read the aircraft sharing section of this guide for more). Connections can be made as Pilot Flying, Pilot Not Flying, or Observer. Once connected, roles can be changed at any time by clicking these same buttons.
Please Note: If connected as an observer and wish to change roles, make sure the host has permitted observers to change role in the host’s addon manager.
¶ Documents
The documents applet is used to view images (.jpg, .png, .gif, or .bmp) added by the user.
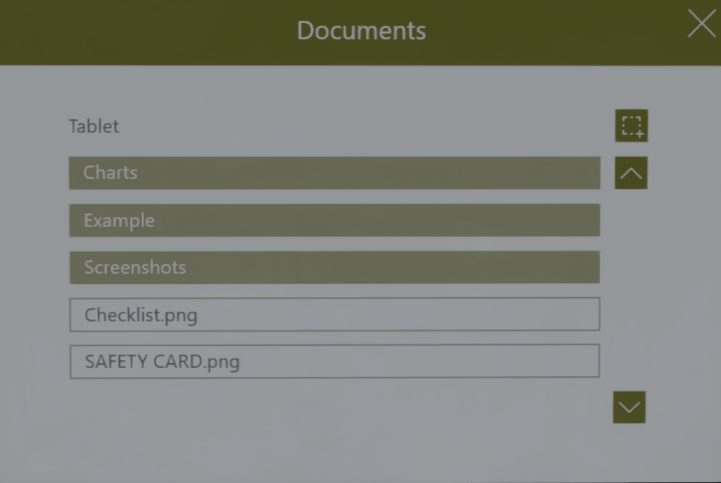
The button in the top right of the file browser can be used to open the screenshot tool. This tool will allow screenshotting of open applications for quick importing of documents. These will be added to the screenshots folder of the browser automatically.
To scroll, click the up and down buttons on the right side of the browser.
To add images, save an image as one of the four supported files, and place it in the folder structure located at: User Documents\TFDi Design\717 Folder\Tablet\Documents. Folders can be created for more structure, see the example folder and image as a template.
With an image opened, zoom in and out using the mouse wheel, move around the image by clicking and dragging with the mouse, rotate the image by clicking the Left arrow or Right Arrow on the bottom right of the tablet, and refresh an image by clicking the center button on the bottom right.
To go back, click the back arrow in the top left of the tablet.
¶ Status
The status applet can be used to display several load items and can be used to change the aircraft state.
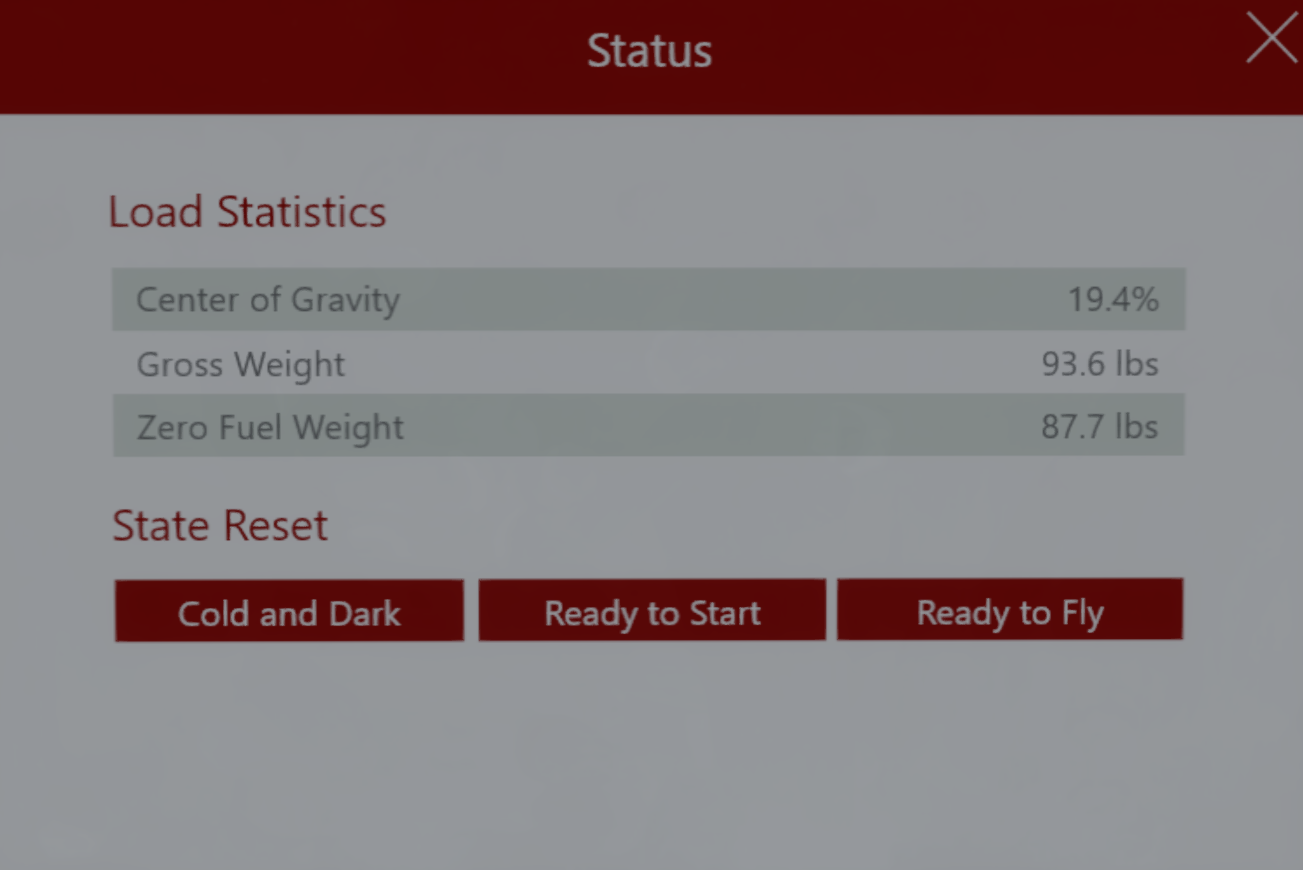
The load statistics are used during the Weight INIT page for the GW, BLST IN ZFW, and TOCG selection. Please note: ZFWCG is not needed.
The aircraft states can be used to change the aircraft state at any time. Cold and Dark will set the aircraft to a completely powered off state. Ready to Start will set the aircraft to a state where the engines are ready to be started. Ready to Fly has the aircraft completely setup and configured for takeoff. Please note: changing aircraft states will clear any data entered into the MCDU.
¶ Settings
The settings applet can be used to change different systems and sounds logic in the aircraft.
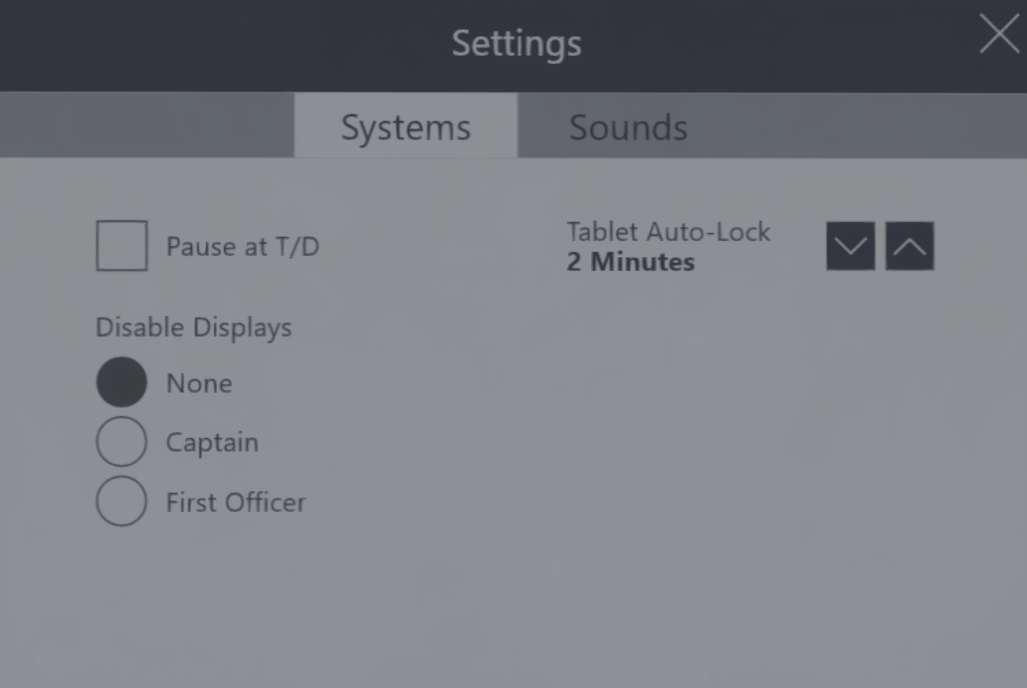
To change between the systems tab and the sounds tab, click on the respective name on the top bar beneath the Settings title.
Three settings can be changed in the systems tab: display disabling, pause at top of descent, and tablet auto-lock.
The disable displays option can be used to improve performance at any given time. Selecting Captain will disable the left displays, while First Officer disables the right displays.
The Pause at T/D option is used to automatically pause the aircraft at the top of descent.
The tablet auto-lock setting is used to change how long the tablet will stay awake before sleeping.
On the sounds page, change three settings can be changed. This includes volume, mute on lost focus, and device selection.
Volume can change how loud the aircraft systems are. For full volume control, used the in-sim volume mixer in the settings.
The mute on lost focus option will automatically mute the aircraft when the simulator is not the focused window on the operating system.
To change the playback device (i.e. headphones, speakers, soundbar, etc.) scroll through this list and select the desired device to hear the aircraft sounds from that device by clicking on the device’s name.
¶ Importing Company Routes
To import company routes, a route generator that supports the TFDi Design 717 format (i.e. SimBrief) is needed. Once a company route has been downloaded, place it in the following location: User Documents\TFDi Design\717\Company Routes.
¶ Aircraft Specifications
¶ Dimensions
The aircraft dimensions are displayed below.
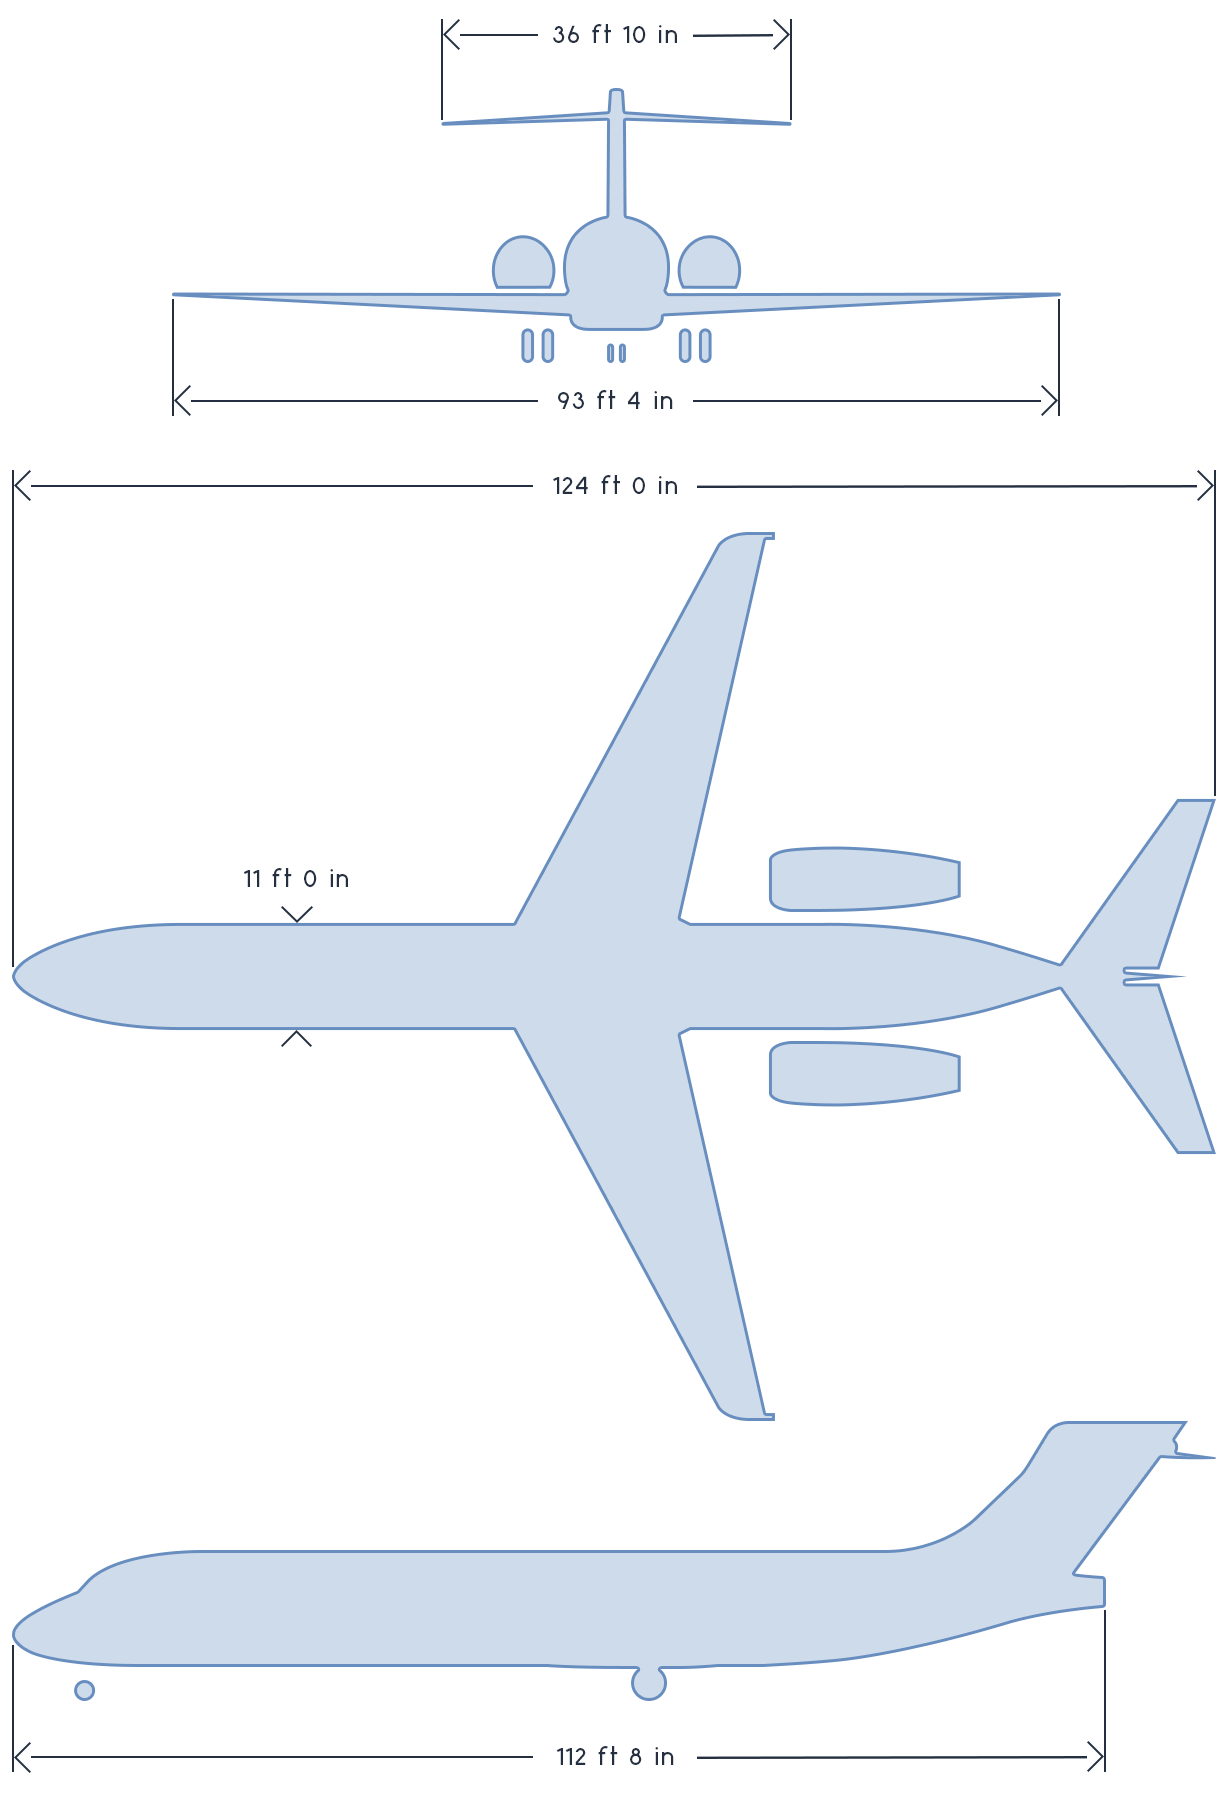
¶ Statistics
Various statistics are listed below.
- Length: 124 feet (37.8 meters)
- Wing Span: 98 feet 5 inches (28.47 meters)
- Tail height: 29 feet 1 inch (8.92 meters)
- Fuselage Width (external): 10 feet 11.6 inches (3.342 meters)
- Cabin Width (internal): 10 feet 3.8 inches (3.145 meters)
- Passenger Capacity: 1 class: 117; 2 class: 106
- Empty Weight: 67,500 lbs (30,617 kgs)
- Maximum Take-off Weight (MTOW): 110,000 lbs (49,900 kgs)
- Cargo Capacity: 935 ft³ (26.5 m³)
- Service Ceiling: 37,100 feet (11,300 m)
- Cruising Altitude: 34,100 feet (10,400 m) cruise altitude
- Cruising Speed: mach 0.77 (504 mph, 438 knots, 811 km/h)
- Maximum Range: 1,430 nmi (2,645 km)
- Fuel Capacity: 3,673 US gal (13,903 L)
- Engine Thrust: 18,500 lbf (82.3 kN) or 21,000 lbf (93.4 kN)
¶ Addon Manager
The addon manager is a utility that helps configure various settings for the aircraft and installs/updates the aircraft. It includes a fuel and weight loader, aircraft sharing server, installation manager, and aircraft configuration manager.
¶ Fuel And Payload
The Fuel/Payload tab in the addon manager is used to configure the load for the aircraft.
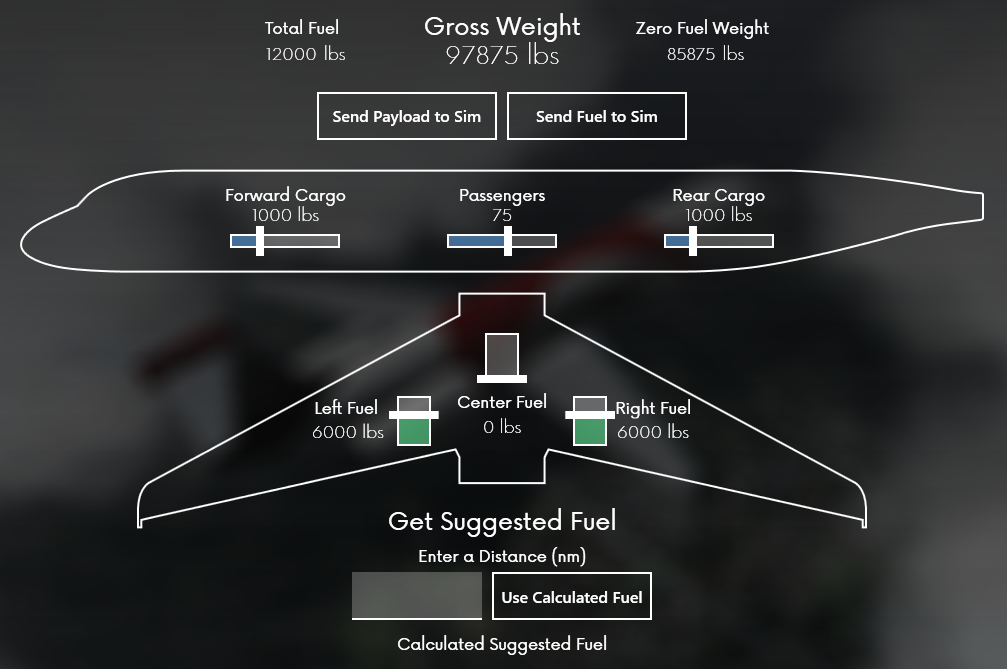
Any of these values can be set while the plane is loaded in sim. Different load statistics are displayed at the top of the page, including pending total fuel, gross weight, and zero fuel weight. Beneath that there are two buttons, one for sending payload settings to the simulator, and one for sending fuel settings to the simulator. Beneath those are two sets of three sliders; The top set is for payload settings, while the bottom set is for fuel settings.
The “Passengers” slider is not a linear weight slider; each passenger will be randomly assigned a seat and weight. This will affect the gross weight and center of gravity with variance every time this slider is moved regardless of the prior number (even if the number hasn’t changed).
Any of the sliders can be moved by dragging the bar back and forth to a desired value or can be changed precisely by clicking on the slider and using the arrow keys to change the value incrementally.
A fuel calculator is located at the bottom of the tab. Enter the distance in nautical miles that the flight will be traveling and a suggested fuel load will be displayed. The fuel can be automatically set in the addon manager by clicking the use calculated fuel button.
Please note: It is required to use the send fuel to sim button after clicking the use calculated fuel button.
¶ Aircraft Sharing
The aircraft sharing tab can be used to host and connect to aircraft sharing sessions.
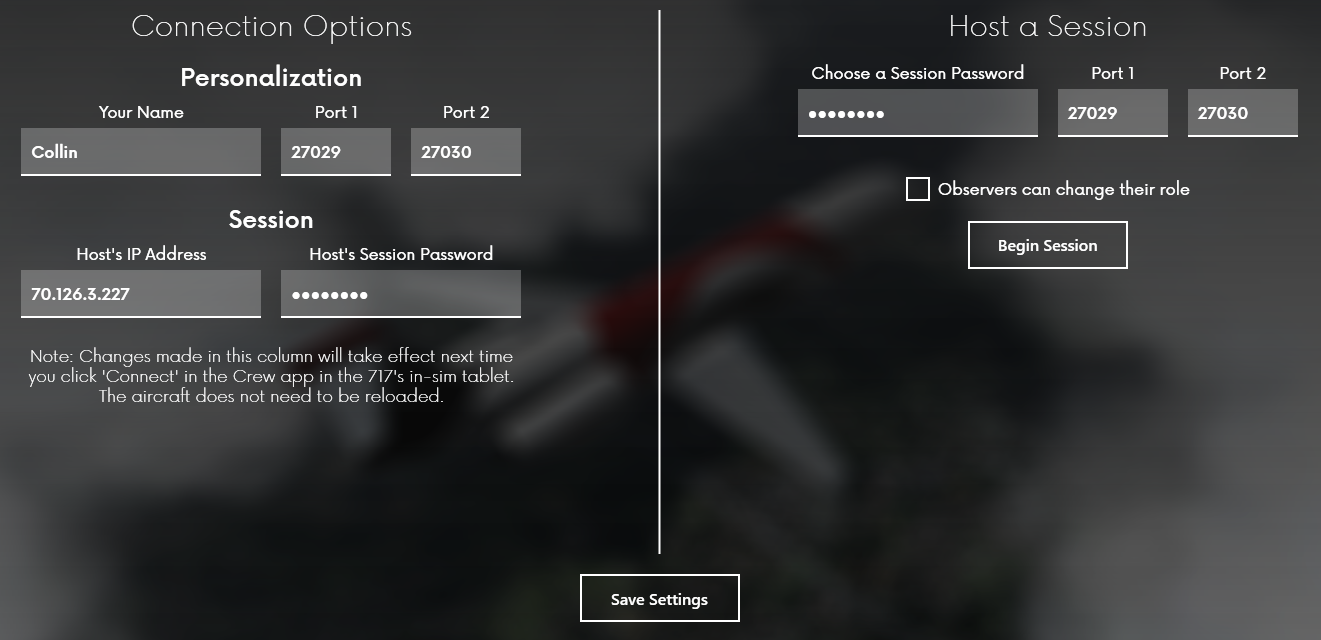
A session allows for multiple people to connect and manage a single aircraft at a time. It can have a pilot flying, a pilot not flying, and observers. The pilot flying has access to flight controls (yoke, rudder pedals, and throttle) while the pilot not flying does not. Both positions can operate all systems on the aircraft otherwise. An observer can follow along on the aircraft but cannot modify the aircraft’s state.
On the left side there is a section entitled “Connection Options” where the information for connecting to a session can be entered. Enter a display name, the two ports that the server is port forwarded through, the host’s IP address, and the session password. Please note: If hosting, this side needs to be updated to the information entered on the “Host a Session” column. If hosting, enter in 127.0.0.1 as the host’s IP address and the password that was set on the right side of this tab. To send the data to the sim, scroll down and click save settings.
On the right side there is a section entitled “Host a Session” where a session password is provided and the two ports that have been port-forwarded (read the port forwarding section for more info) are entered. The session password can be up to 8 characters long. Another option that can be enabled is the ability for observers to change their role. Once this has been completed, scroll down and select “Begin Session”.
Port forwarding is essential before hosting a server. To port forward, login to the router and forward the selected ports that are listed in the addon manager. It is highly recommended to use the default ports. A comprehensive list of router port forwarding guides can be found here: https://portforward.com/router.htm. When clicking on the router manufacturer, a full page ad will appear, click close on the bottom and a list of products will appear afterwards.
¶ Installation
On this page, all aircraft installation information will be found.
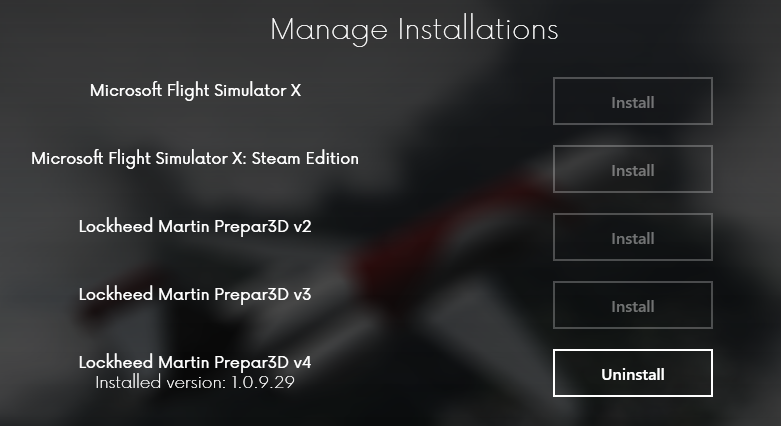
The available simulators will appear with an install button next to them, if the simulator is not found, the Install button will be greyed out. Once the aircraft is installed, the installed version will appear beneath the simulator title. To uninstall, click Uninstall next to desired simulator, after that is done, go to \SimObjects\Airplanes and delete the TFDi_Design_717 folder.
¶ Settings
At the top of the addon manager, there is a gear icon. Click this to access the Addon Manager Options page. On this page, there are several options, including the ability to minimize the addon manager to the system tray when clicking the close button, rather than closing the addon manager. The second option is to sign out of the addon manager. On the About tab, the current version of the “TFDi Design Addon Manager” is listed.
¶ Customize
At the bottom of the addon manager, there is a button to enter the Customization page. There will be four tabs to choose from on the top: Default State, Options, Systems, Performance. For all of these options, the simulator must be restarted before the changes will take effect.
The Default State tab allows for the aircraft to be loaded up in a previously setup state.
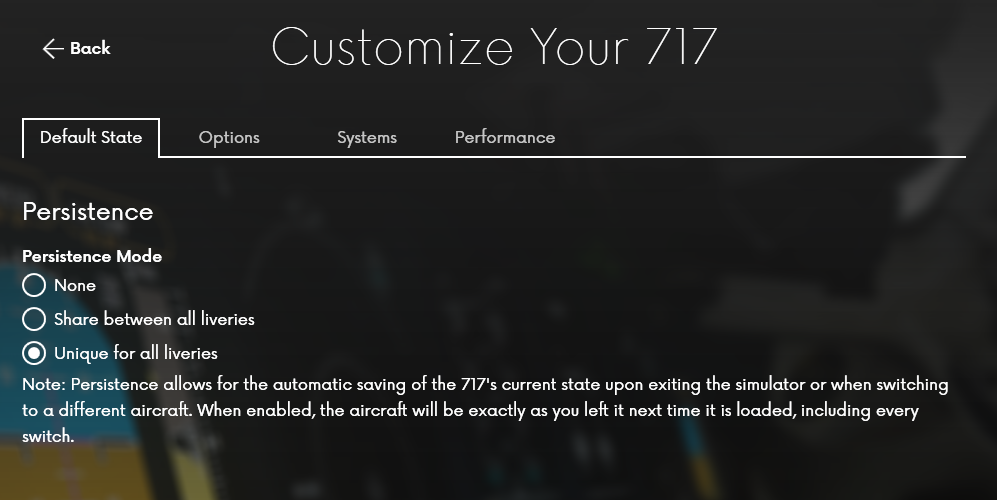
It will use the Persistence system, which automatically saves the state the aircraft was in when the simulator was closed. There are three options to choose from: None, Share between all liveries, and Unique for all liveries. None will disable the Persistence system and load the aircraft into cold and dark every flight. Share will save the state of the aircraft when it was last used and use the previous state regardless of livery. Unique will store a persistence save for every livery and will load only the persistence file for that specific livery.
The Options tab is used to modify parts of the aircrafts that are not related to the systems.
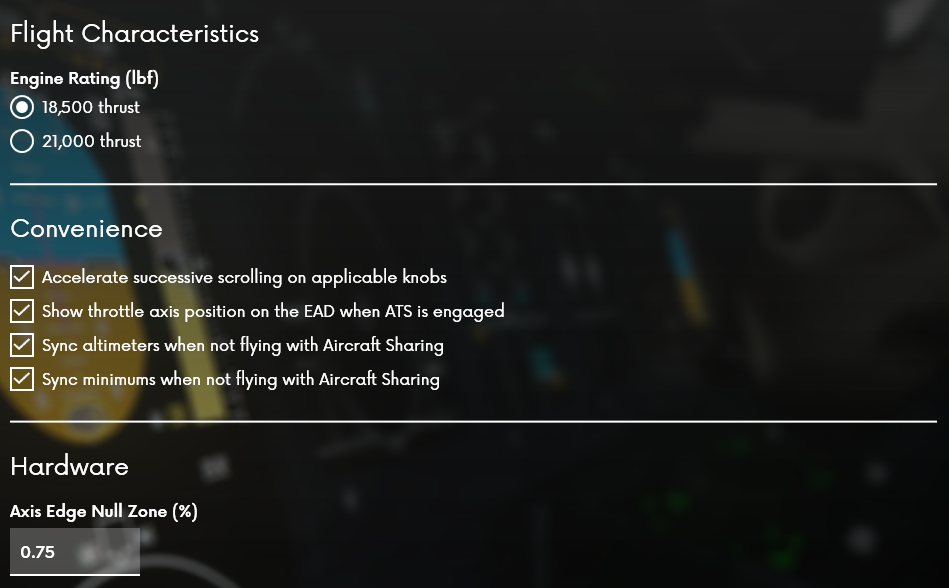
The first section is flight characteristics, which allows modification to the rated engine that is equipped on the aircraft. The lower thrust variant is the variant that came equipped during original delivery, while the higher thrust variant was provided as an upgrade to existing aircraft.
The second section is convenience options, which offer various quality of life options for the aircraft. The first allows accelerated scroll on specific knobs in the aircraft, which allows for the scrolling to increment at a higher rate with a certain number of successive scrolls. The second option allows for a secondary T to be displayed on the engine alert display. This secondary T will show where the input throttle axis position is located. When this position is not aligned with the in sim ATS throttle position, the secondary T will appear amber, and green when the two are aligned.
The third and fourth option pertain to solo flight of the aircraft. When flying and not actively in an aircraft sharing server, the altimeters and minimums will sync between the captain and first officer’s equipment.
At the bottom of the page is the hardware section. This option allows for the configuration of hardware null zones on the aircraft. This setting will ignore inputs on the edges of the axis as set in this entry field. In example, if a controller’s range of motion only activates from 3% throttle in sim to 97% throttle in sim, the proper setting for this would 3%. This would allow the sim to read the inputs from the controller as 0-100%.
The Systems tab allows for many different options to the systems on-board the aircraft.
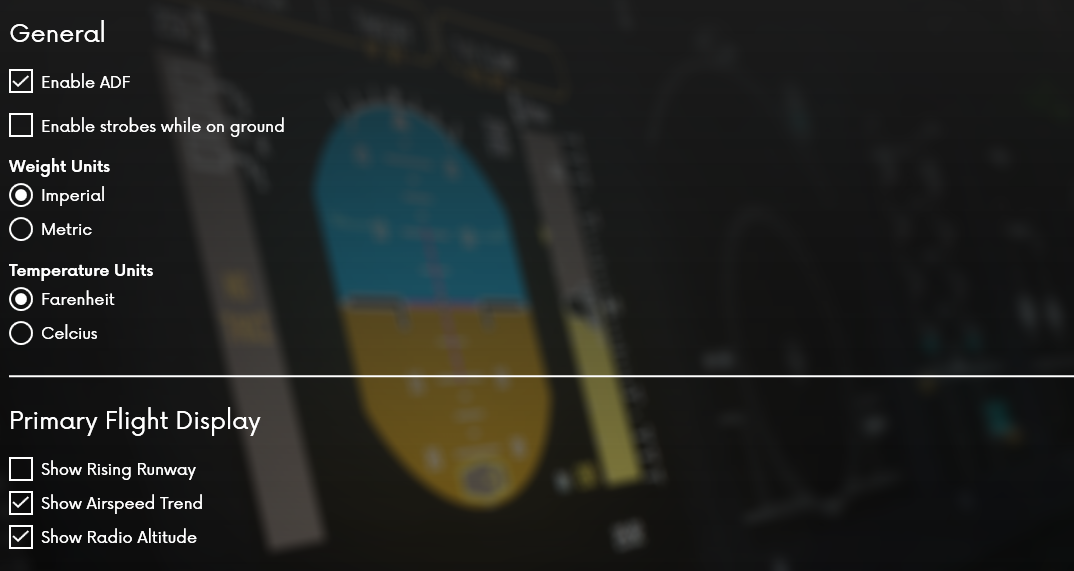
The first section is titled General and provides 4 different settings. Enable ADF enables the ADF radio navigational system. Enable strobes while on ground allows the HI-INT lights to turn on when the nosewheel is on the ground. The aircraft by default will only turn these lights on once the nosewheel is off the ground, however some airlines have modified this logic to enable it on the ground as well. Weight and Temperature units will change how the aircraft reads and displays units. The addon manager will also follow this unit selection. Please note: to change the altitude tape units, select the ALTITUDE MODE button on the glare shield.
The Primary Flight Display section allows modification of what is displayed on the Primary Flight Display. Show Rising Runway will display a magenta polygon in the shape of a runway when coming into land. This will rise from the bottom of the artificial horizon to the middle. The airspeed trend option allows for an arrow to be displayed on the airspeed tape that extends the distance the tape will move over the next 10 seconds at the current acceleration. The show radio altitude option will allow for a radio altitude indicator to appear beneath the artificial horizon when the aircraft is at or below 2500 feet.
The Navigation Display section allows for modification to what is displayed on the Navigation Display. Map Symbology changes the symbols for waypoints on the ND from either the US standard or European standard. The wind indicator changes what style wind indicator is displayed. Vector shows one arrow pointing in the direction of the wind and its speed. Track shows two independent arrows, one displaying crosswind component and the other displaying headwind/tailwind component. Terrain display allows for the terrain display to enable/disable peaks mode. Peaks mode allows for terrain that would otherwise be outside of the range of terrain display to continue to be displayed. This mode will display terrain that is close to being in vertical range as solid green, while terrain further outside the vertical range will be displayed as dotted green.
The ADIRUs section allows the changing of the alignment time. The ADIRU alignment time modifies the amount of time the IRS and associated systems take to align and display data on the displays. The GPWS/EGPWS section allows for modification the sound clip that is played when approaching the decision height.
The Performance tab is extremely useful in configuring different settings for rendering and display to improve performance or quality of the aircraft.
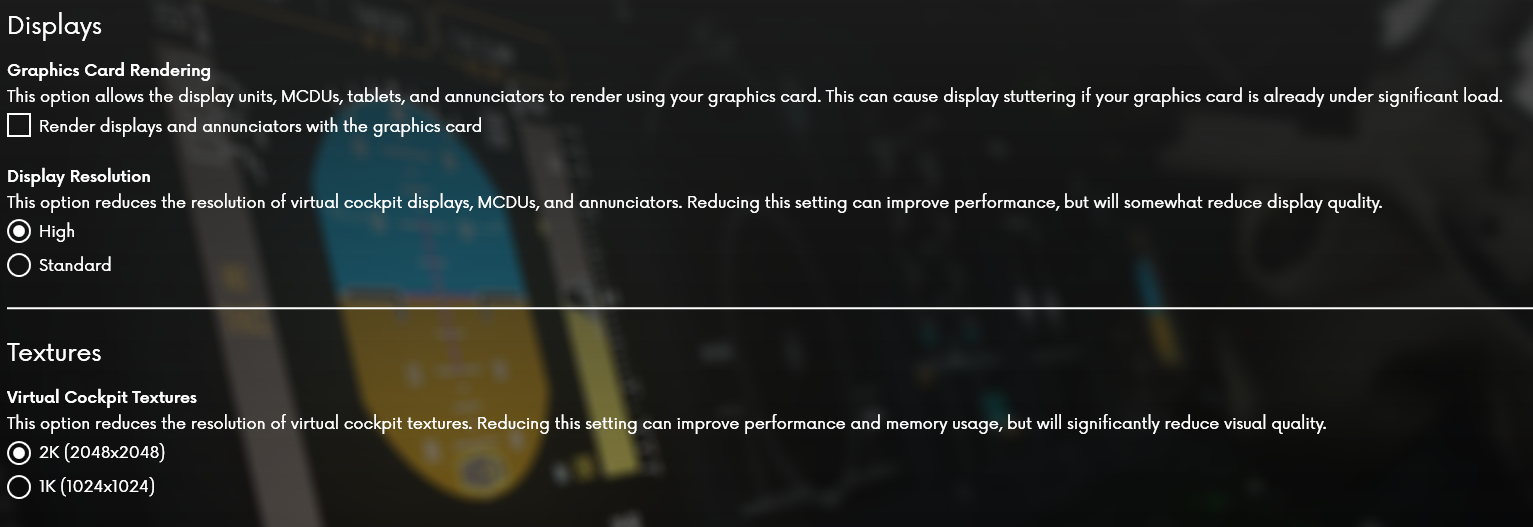
The first section is the Displays section. This section has two settings to modify performance. The first is Graphics Card Rendering; this option allows for the display units to be rendered using the graphics card in the computer rather than the central processor. This option is recommended for FSX and FSX:SE. This option must be turned off when using a render modification utility (NVIDIA Inspector) to force the simulator to render with sparse grid super sampling anti-aliasing. Please note: SGSSAA must not be used with P3Dv4 as this will cause anomalies with rendering.
The Display Resolution option will allow rendering of the displays in high definition or standard definition. Modify this option as needed.
The textures section allows for different texture sizes and options to be used in simulator. The lower 1k textures will help lower VRAM usage and improve performance. Disabling rendering to transparent textures (in Prepar3D v4) can help with performance in some cases. Change as needed.
Under the Systems section is an option to use an alternate database connection method. This option can help if there are issues connecting to the navigation database.

The other buttons are easy to understand and will open various locations.
The documentation button will open the documentation folder in the user directory. Here all documentation related to the TFDi Design 717 will be found.
The Repaints button open the default browser and will load the downloads section of the forum. Browse here for different liveries that are not included by default.
The Get Support button will open the forums in the default browser. Please note: if there are issues related to a TFDi Design account, please open a ticket with us on the main TFDi Design website instead.
The Credits button will open the credits page. This page will display the individuals who contributed to the aircraft or aided the development over the last 6 years.
¶ How To Add Liveries
To download repaints/liveries, click the repaints button on the bottom of the Addon Manager. This will open the default browser and display the downloads section of the TFDi Design forum.
A forum account is needed to download anything from the forum. Otherwise an error will be displayed when attempting to download. To create an account, click the sign-up button in the top right corner.
Once done, find a suitable repaint and click download. Once downloaded, extract the files to a folder. Open the simulator root folder and go to SimObjects\Airplanes\TFDi_Design_717 and move the Texture.XXX folder in here.
In the original folder, look for a text file that has an configuration with the title of [fltsim.XX]. Copy the whole configuration starting with [fltsim.XX] to the end of the description entry. Paste this into the aircraft.cfg configuration file after the last [fltsim.XX] entry (Please note: the last entry will not have XX, rather a number).
Once this has been pasted beneath the last [fltsim.XX] entry, replace the XX in the newly added livery with the next sequential number. For example, if the previous entry was [fltsim.03] the next entry will be [fltsim.04].
¶ Support
There are several ways to get support or help improve the product. They are listed below.
¶ How To Get Support
- Reach out to the community support forums at https://forums.tfdidesign.com
- Open A Ticket at https://support.tfdidesign.com/support/home
¶ Support Hours
The following times are when support is expected to be available and to respond within industry standard times. All times in Pacific Standard Time (PST).
Monday - Friday: 10AM-8PM
Saturday & Sunday: Closed
Please note: The support office is also closed on all United States Federal Holidays.
Hours may change, verify current hours on the main TFDi Design website.
¶ Legal
Invernyx, Inc.
TFDi Design is a legally registered name operating under the ownership of Florida-registered corporation Invernyx, Inc. More information on Invernyx, inc.can be found at http://Invernyx.com.
This document and all subsequent documents included in this package are for use with the TFDi Design 717 only. No document included in this package may be used for training purposes under any circumstance. All documents included are written for entertainment purposes only.
All documents and files included in this package are Copyright © Invernyx, inc. d.b.a. TFDi Design
All images contained in this document and all documents included in the package are taken in sim or used with permission.
Produced under license. Boeing and Boeing 717, their distinctive logos, product markings and trade dress are trademarks of The Boeing Company.