¶ Overview
smartCARS 2 is an easy to use and modern virtual flight tracking application designed and developed by TFDi Design. Starting out as an ACARS for a single virtual airline, smartCARS has grown into a retail product, extending beyond the functionality of a simple flight tracker. smartCARS lets a pilot view their own flight and hundreds of other active flights on a live map, see their overall statistics, and chat with an ever-expanding community.
This document will describe all of the features that smartCARS has to offer and how you can best benefit from them.
¶ Pilot Center
The Pilot Center allows you to view your most important pilot statistics, your previously completed flights and submitted PIREPs, and the latest news/information from your virtual airline.
¶ Statistics
Your statistics are representative of any and all flights you have done during your time with your virtual airline. When actively being loaded/refreshed, the statistics themselves will be displayed as double dashes (“--“).
¶ Viewing Past PIREPs
You can view your past flights by clicking the “View PIREPS” button below the pilot statistics section of the Pilot Center page. You will then be presented with, by default, a list of all past PIREPS you have submitted to your virtual airline. Use the search filters at the top of the page to narrow down the list to a specific flight or flights if you wish.
Select a PIREP from the list and click “View Details” at the bottom right of the page to view all details of that PIREP.
¶ Flights
The Flights tab is where you will bid on flights, as well as find the flights that you have already bid on. Clicking on a specific flight in the list view will display more information in the table at the bottom of the page.
¶ Bidding on a New Flight
By clicking the “New” button at the bottom of the page on the Flights tab, you will be taken to a page where you can search for new bids.
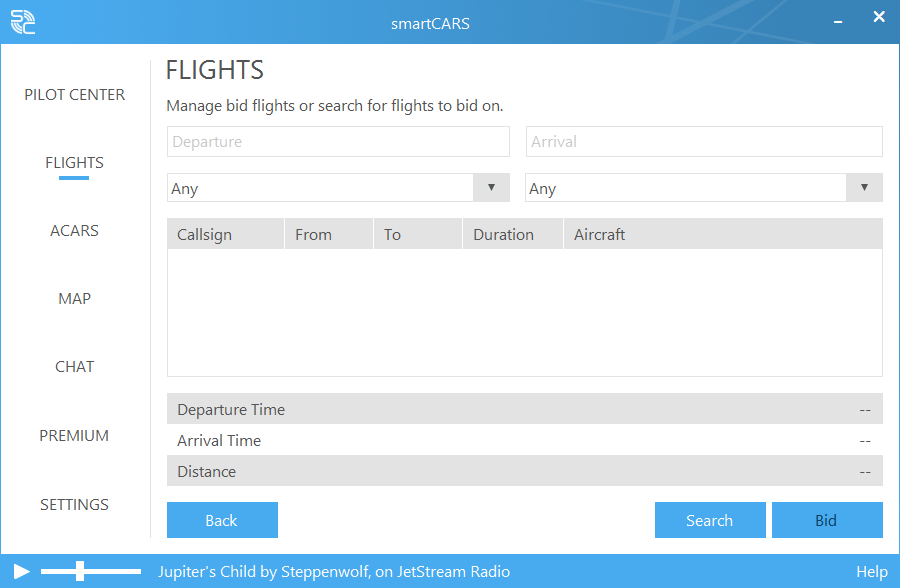
You can easily search for a flight to bid on by setting the various filtering options available at the top of the page. Once you have found a flight that you want to bid on, simply select the flight and click the “Bid” button at the bottom right of the page.
Note: Only 1,000 flights can be shown at once. This helps to keep down server load and offer quicker search results.
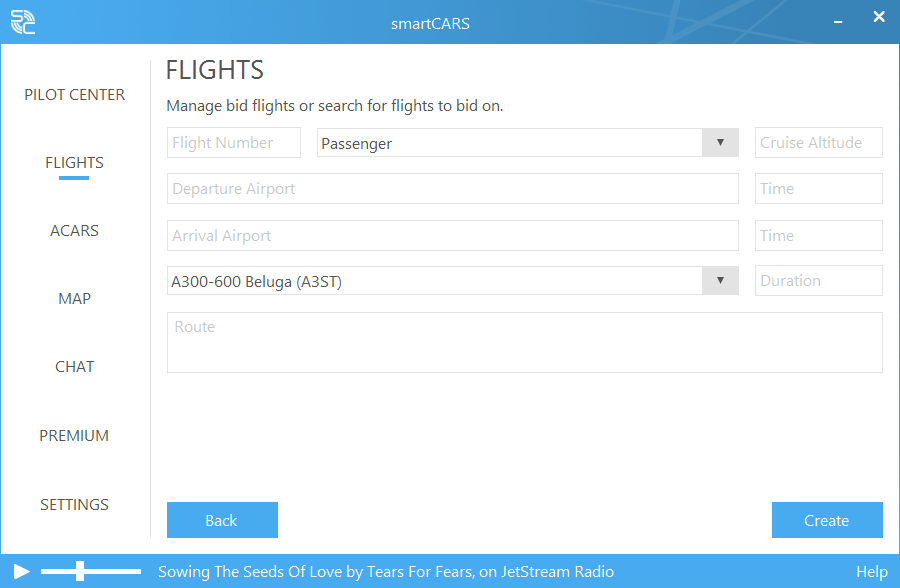
¶ Chartering a Flight
If your virtual airline has it enabled, you can use the charter system instead of bidding on an existing flight. The charter system allows you to essentially create your own flight that is not already in your virtual airline’s database. At the bottom of the page on the Flights tab, you will find a “Create” button. This will take you to a page where you can enter all of the information needed to create a flight.
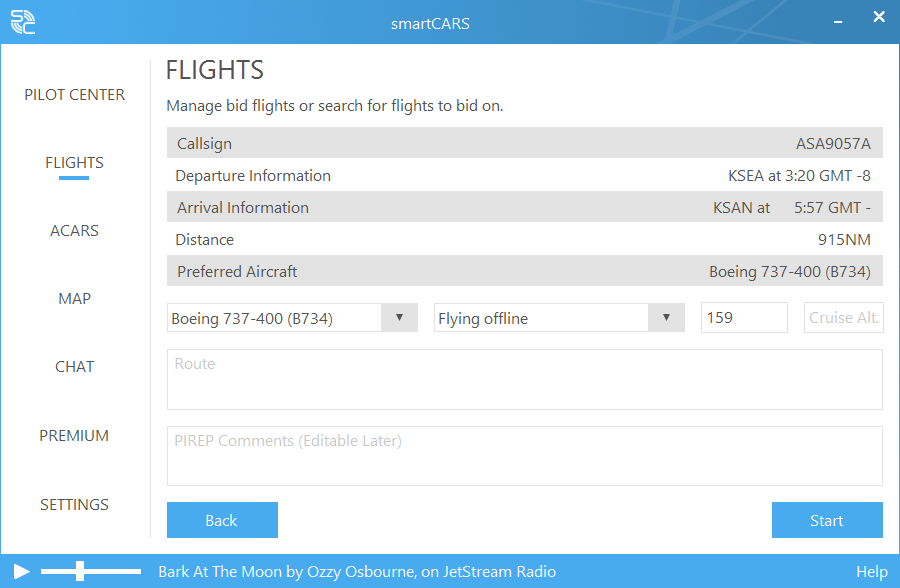
¶ Starting a Flight
When you have either selected a bid or created a charter flight and selected it on the Flights page, you can click “Fly” to begin preparing to fly it.
Once you have customized all of the options on the flight set up page, you will be ready to fly. Ensure that your flight simulator of choice is running and loaded up at the appropriate airport. You can then click the “Start” button to begin tracking the flight.
¶ ACARS
The ACARS tab is where you can view the progress of your currently active flight. At the top, you can view your distance from both the departure and arrival airports. You can also view the total flight time, your time until arrival, and a log of all major events that occur during your flight (take off, cruise, landing, etc.).
![]()
Clicking the gear icon next to the cruising altitude will allow you to edit it, should you need to for any reason. To save your changes, simply click the check icon that replaced the gear icon.
¶ Map
The Map tab lets you see both your active flight and all other flights currently happening on smartCARS. Clicking on an aircraft on the map will display the pilot’s name, the itinerary, and aircraft type.
¶ Chat
The smartCARS client includes a powerful instant messaging system. This chat system allows pilots to communicate privately and with other members of the community.
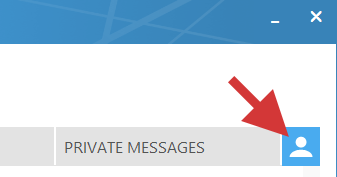
¶ Active Users Menu
The Active Users Menu can be accessed at the top right of the chat page. This displays a list of all online users, as well as any active private messages.
Tip!
You can double click on a users name in the active users list to start a private message with them.
¶ Global Chat VS. Airline Chat
The smartCARS chat system provides two methods of public chat: Global and Airline. Messages sent in the Global chat will be sent to every online smartCARS user. Airline messages will be sent to any pilots from your virtual airline that are currently online.
¶ Private Messages
The third tab on the smartCARS chat is where you can view a private message. You can switch between private messages via the Active Users menu. At any time, you can double-click the name of anyone in the Active Users menu, or left click on their name in the chat display area and select “Private Message.” Right-clicking their name in the Active Users menu opens the same options panel. When receiving a new private message, a slide-in notification will be displayed at the top of the smartCARS window.
¶ User Guidelines and Expectations
All useres must abide by the follwing:
- Show a respectful attitude towards others
- No excessive/aggressive profanity
- No distribution of illegal content
- No attempts to recruit pilots from other virtual airlines
¶ Moderator Guideliens and Expectations
If a user violates the guidelines explained above, a moderator has the right to kick that user. A user can be immediately removed from the chat system by left-clicking their name in the chat display area, and selecting “Kick” from the popup menu that displays. The same option is available when right-clicking a user’s name in the active users menu, accessible at the top right of the chat.
If a user returns to the chat system after being kicked and continues to violate the guidelines, a moderator then has the right to ban that user. A user can be banned via the same methods used to kick them, except using the “Ban” button instead
Note: If a moderator feels that a user should be permanently banned from the smartCARS chat system, they must open a support ticket with TFDi Design explaining the issue (tfdidesign.com/ticket). A user who feels that they were inappropriately kicked/banned from the chat system may report the issue to TFDi Design via the support ticket system located at tfdidesign.com/ticket.
¶ Premium
As a pilot, smartCARS Premium extends the features of smartCARS beyond any existing flight tracking solution by adding airline-independent PIREP backups, integrated flight recovery, and theme options.
You must sign in to Premium with the same credentials you use to sign in on the TFDi Design website.
¶ Cloud Flight Report and Sim Backups
smartCARS automatically backs up your flight progress and aircraft position to the cloud every 60 seconds when you are signed in to Premium. If smartCARS crashes, the simulator crashes, or your computer shuts off, you can restore your flight from the Premium tab. Simply launch your simulator and load up a flight at a location of your choice in the same aircraft, then click “Restore” at the bottom right of the Premium tab in smartCARS.
In order to use the flight restoration feature in X-Plane, XPUIPC must be used.
¶ Theme
Premium lets you choose between two themes in smartCARS – light and dark. These can be chosen on the Premium tab. As well, you can enable/disable the ability for smartCARS to switch between the two based on the time of day, which can help during late night flights when your room is dark.
¶ Settings
GENERAL
¶ Default Tab
Sets what tab is shown when smartCARS is first opened.
¶ Time Zone
Tells smartCARS to use either Local or UTC time.
¶ Time Format
Sets the format that smartCARS displays time in.
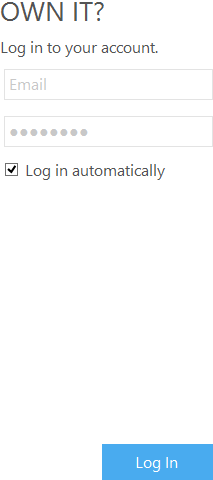
¶ Log in automatically
Remembers your credentials on the login screen and logs in automatically.
¶ Play radio at launch
Automatically plays the radio stream after you log in to smartCARS.
¶ Meters or Feet
Set smartCARS to display altitude in meters or feet.
¶ Speed Units
Set smartCARS to display speed in knots or miles per hour.
¶ Weight Units
Set the flight log to display weight in kilograms and pounds.
¶ Return to Flights page after bidding
Tells smartCARS to return to the list of bid flights after bidding on a new flight.
¶ Confirm exit
Prompts the user to confirm closing smartCARS while a flight is running.
CHAT
¶ Flash the taskbar icon when new messages arrive
Tells smartCARS to flash the icon in the taskbar when a new message is received.
¶ Show drop down notification for new private messages
Enables an animated slide-down notification when a new private message is received.
¶ Sound Packs
The smartCARS client allows for the creation of custom sound packs, which enables the replacement of the default crew announcements, flight attendant announcements, GPWS callouts, and chat notification sounds. This documentation explains the architecture of sound packs in smartCARS and what is required to make your own.
¶ Folder Structure
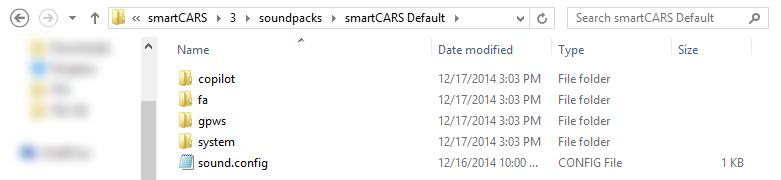
In order to create a sound pack, we first need to understand the folder structure of the default sound pack. Let’s start by opening the default sound pack folder, located in the following directory:
<INSTALL DIRECTORY>\smartCARS\<AIRLINE ID>\<LANGUAGE>\soundpacks\smartCARS Default\
Note: Never rename or modify the default sound pack. This may prevent other sound packs from functioning.
The default sound pack folder contains four folders: copilot, fa, gpws, and system.
- copilot – This includes the announcements that play at 10,000ft and 18,000ft. Also in this folder are the copilot-spoken ground proximity warning callouts.
- fa – These are the flight attendant announcements, which include clips played during boarding, pushback, cruise, and descent, and landing.
- gpws – These are the Ground Proximity Warning System callouts. These are played by the aircraft’s GPWS, not spoken by the copilot.
- system – The notification sounds for all types of chat messages.
smartCARS will use the name of the soundpack folder as the soundpack name. For example, the soundpack in the “smartCARS Default” folder will appear as “smartCARS Default” in the soundpack selector in the smartCARS settings menu.
¶ Configuration File
The sound.config file defines which audio files play for what events. This file must be in your sound pack folder. The screenshot below is an example of a sound pack folder.
The sound.config file can be edited with any text editor, such as Notepad or Notepad++. Once open, you should see something similar to what is displayed in the following screenshot.
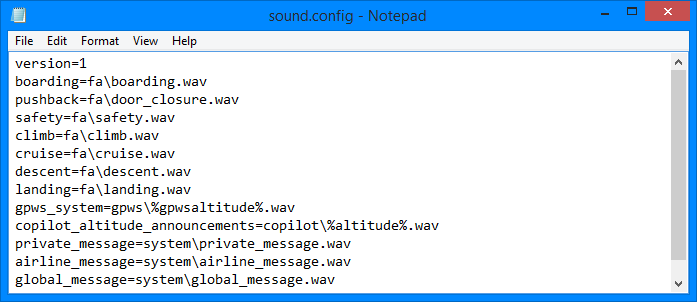
Below, we will break apart each variable to explain what its purpose is. If you wish to disable a variable without removing it from the configuration file completely, you can add a double forward slash ( // ) at the start of the line. Leaving variables disabled allows you to easily store them for future reference.
Note:
In this documentation, “variable” refers to the text before the equal sign ( = ), “value” refers to the text after the equal sign, and “macro” refers to the %{data}% placeholders that smartCARS will replace with relevant data when playing sounds.
Do not use an equal sign in any value string. This will cause the sound pack to function improperly.
Do not use a space in between the equal sign and the first character of the value.
All audio files must be saved in the WAV (.wav) file format. No other format is supported.
smartCARS will alias a default sound if an audio file is not defined in the sound.config file. If -it is defined, but cannot be found in the sound pack’s folder, no sound will play at all.
-
version - This is the version number of your sound pack. It is used by the web system to determine if it is the latest version of the sound pack.
Example: version=1 -
boarding - The relative location of the boarding audio file. This plays directly after you launch a flight. When defining flight attendant announcements, you can put %tod% in the value and when played, it will be replaced with one of three time of day-based strings. Between 5:00 AM and 11:00 AM, %tod% will become “morning”, between 11:00 AM and 5:00 PM, %tod% will become day, and between 5:00 PM and 5:00 AM, %tod% will become “evening”. All times are based on the local time of your flight simulator.
Example: boarding=fa\boarding.wav -
pushback - The relative location of the pushback audio file. This plays when pushback is initiated. This variable supports the %tod% macro.
Example: pushback=fa\door_closure.wav -
safety - The relative location of the safety announcement audio file. This plays during taxi to the runway. This variable supports the %tod% macro.
Example: safety=fa\safety.wav -
cruise - The relative location of the cruise audio file. This is played once the aircraft has reached cruising altitude. This variable supports the %tod% macro.
Example: cruise=fa\cruise.wav -
descent - The relative location of the descent audio file. This is played when the aircraft begins its descent. This variable supports the %tod% macro.
Example: descent=fa\descent.wav -
landing - The relative location of the landing audio file. This is played after the aircraft has touched down. This variable supports the %tod% macro.
Example: landing=fa\landing.wav -
gpws_system - The relative location of the GPWS callouts (different from the copilot callouts). These callouts are played during approach and before landing. When played by smartCARS, %gpwsaltitude% will be replaced with the altitude that the callout represents (at 50 feet, %gpwsaltitude%.wav would become 50.wav). If you wish, you may add a prefix and/or suffix to the filename. A prefix or suffix can be anything within the filename character limit of Windows. The available GPWS callout altitudes are 2500, 1000, 500, 400, 300, 200, 100, 50, 40, 30, 20, and 10.
Examples: gpws_system=gpws\%gpwsaltitude%.wav -
copilot_altitude_announcements - The relative location of the copilot altitude announcements. ‘The 10000.wav’ and ‘18000.wav’ clips are played during climb and descent. The rest are played during approach and final only. Copilot altitude announcement clips should only be a few seconds long. You may add a prefix and/or suffix to the filename, but it is not necessary. A prefix or suffix can be anything within the filename character limit of Windows. When played, %altitude% works the same as %gpwsaltitude% but for copilot callouts; %altitude% will be replaced with the altitude the callout represents (a callout for 500 feet would cause smartCARS to look for 500.wav).
If one of the copilot callout is missing, that specific clip will not play, but the others will. The 10000ft and 18000ft announcements are not controlled by the GPWS settings, but by their own settings. The available copilot altitude announcements are 18000, 10000, 2500, 1000, 500, 400, 300, 200, 100, 50, 40, 30, 20, and 10.
Examples: copilot_altitude_announcements=copilot\%altitude%.wav -
private_message - The relative location of the private message audio file. This is played when a user receives a new message via the chat system.
Example: chat_global=system\chat_global.wav -
airline_message - The relative location of the airline-only chat audio file. This is played when a user receives a new airline-specific chat message.
Example: airline_message=system\airline_message.wav -
global_message - The relative location of the global chat message audio file. This is played when a user receives a new global chat message.
Example: global_message=system\global_message.wav